Create vROPS dashboard for NSX-T SSL Certificates Remaining Days
In this post I wanted to showcase how you setup and utilize vRealize Operations Manager with CloudProxy and Telegraf Agent with a Custom Script and display the information for the remaining days for NSX-T Certificates.
This post is based on Thomas Koptons blog about how to utilize Application Remote Collector with vRealize Operations 7.5.
I wanted a more updated version since I was running vROPS 8.6.4 and the names and where to find menues have changed since then. But thank you to Thomas for providing with a great post and also premade customscript and dashboard.
Of course this method could be used to also display all other HTTPS Certificates that you might have on the same dashboard.
First of we need to install the Cloud Proxy that comes with the latest version of vRealize Operations Manager 8.6
Installing Cloud Proxy
Content
Referencing the following link in the VMware docs: Configuring Cloud Proxies in VMware Cloud
We start off in vROPS and go to Data Sources and Cloud Proxies and hit the New button.

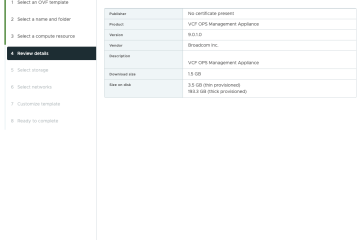
Here we download the Cloud Proxy OVA and then import it into the vCenter where we would like to collect information from the Telegraph agent that we later on will install on a VM (Ubuntu) in this guide.
When setting up the OVA in vCenter we need to make sure to add the One-Time Key that is provided in the window of the Cloud Proxy in vROPS.

In vCenter we import the OVA and go through the guide for setting up the VM, with the OTK, IP, DNS, NTP, GW etc.

Since this is an Onprem deployment I do not have a Network Proxy, I added the CA Issuing Certificate for the vROPS Manager.

After all the fields have been filled in and the machine has been powered on in the vCenter UI it will take around 10 minutes and appear within vROPS.

Setup and Configure the Telegraf Agent
Now that the Cloud Proxy has been deployed it is time to install the Telegraf Agent.
First of I have deployed a simple Ubuntu VM that will run the Custom Script that I will upload into the VM.
It is important to add a service account user in the Ubuntu machine before the installation of the Agent can take place.
By following the documentation at the following link User Account Prerequisites; I added the service account, arcuser
Create the arcgroup and arcuser and associate the arcgroup as the primary group of the arcuser.
The arcgroup must be the primary group of the arcuser. The following commands can be used to create the arcgroup and arcuser:
groupadd arcgroupuseradd arcuser -g arcgroup -M -s /bin/false
The arcuser must have password-less specific set of privileges as mentioned below, which must be written in /etc/sudoers file or in the folder /etc/sudoers.d/:
Run: vi /etc/sudoers.d/arcuser
And input into the file the following commands:
Cmnd_Alias ARC_RUN_COMMANDS=/usr/bin/systemctl * ucp-telegraf*,/bin/systemctl * ucp-telegraf*, /usr/bin/systemctl * ucp-minion*, /bin/systemctl * ucp-minion*, /usr/bin/systemctl * salt-minion*, /bin/sytemctl * salt-minion*, /usr/bin/netstat, /bin/netstat, /opt/vmware/ucp/tmp/telegraf_post_install_linux.sh, /opt/vmware/ucp/bootstrap/uaf-bootstrap.sh, /opt/vmware/ucp/uaf/runscript.sh, /opt/vmware/ucp/ucp-minion/bin/ucp-minion.sh arcuser ALL=(ALL) NOPASSWD: ARC_RUN_COMMANDS
Now we can go back to the vRealize Operations UI and find our Ubuntu VM and install the Telegraf Agent:
We find this by going to Environment -> Applications -> Manage Telegraf Agents

Choose the VM and hit the three dots and Install the Agent.
This will install the Telegraf agent into the machine and after completed it will change the Agent status to Agent Running.
Upload the getSSLRemainingDays.sh custom script
First we make sure to download the getSSLRemainingDays.sh script and vROPS dashboard from the VMware Developer site. Link here
Prerequisities for running Custom Scripts
We then copy the script to the folder /opt/vmware in our VM running the Telegraf agent and setup the custom script monitoring in vROPS

We also make sure to set the arcuser as the owner on the script
chown arcuser:arcgroup getSSLRemainingDays.sh
You can also in the cli try and run against the NSX-T HTTPS FQDN and see that you get a number in response (130 in this case). This is the amount of days left until the certificate expires

Configure Custom Script
Since we have installed the Agent on the VM we can now hit the downbutton on it and find some Custom Monitoring
Inhere is where we configure our Custom Script

Hit the three dots left to Custom Script and choose add. Then create a Display Name
The File Path is the path to the getSSLRemainingDays.sh script
Args is the HTTPS FQDN for the NSX-T VIP in this check followed by the port 443

Go ahead and continue to add more checks against more endpoints you wish to monitor Certificates to by adding more Custom Scripts but with a different Args
Import and configure the Dashboard
Now its time to configure the dashboard to show the metrics for the custom scripts that has been created.
Go to Visualize -> Dashboards -> Manage -> and choose the three dots and Import the dashboard that is premade from the developer site. The file comes as a .zip file and can be imported as that.

Go to the folder All and search for tkopton-SSL-Cert-Check, You can change the name of the Dashboard to a better name.
Choose the Dashboard and hit the Pen icon on the Widget

Go into the Output Data section and hit the PLUS icon search for Custom

Select the Script Metric that you want to add to the dashboard

Now edit the Units = Days
Color Method = Custom
Yellow = 60
Orange = 30
Red = 15

And save, you should now be presented with a dashboard for NSX-T

This is a great way to display the Certificate Remaning Days before Expiration for all you Management components you might have in your Datacenter.
You can also in vROPS have so that when the Certificates hits a certain day it will send out an alarm to the operator about it.
Thank you for now!

0 Comments